ChrisTV PVR User Interface
TV Window & ChrisTV Control Panel (only in shareware products)

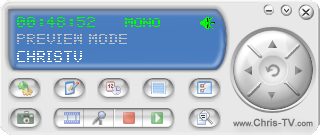
With a single right click on the TV Window you have access to all ChrisTV Settings.
Channels Settings Window - TV Mode
);)
Automatic Scanning Window
(available only in Professional and Standard)
);)
- Choose the start/end frequencies for the automatic scan interval and the step of the automatic scanning. The step can be set to 0.25, 0.50, 0.75, 1.00, 2.00, 5.00, 7.00, 8.00 mhz.
- Choose the right Video Standard (PAL-D in Eastern Europe, PAL-B or PAL-G in Central and Western Europe, NTSC in USA, SECAM - France.
- Choose the Sound Mode - Auto, Stero, Mono, Dual.
- Choose the right Sound System (has effect only if "TV Card has MSP" option is checked) - FM B/G for Stereo Channels.
- Press "Start" button and wait till ChrisTV finds all your TV Channels.
- Press "Save" button to store the channels that were found or "Cancel" button to discard the scanning and keep previous Channels List.
);)
- Choose your country.
- TV Input - TV Cable or Local Antenna.
- Choose the Channel number from wich to begin the scan process.
- Choose the right Video Standard (PAL-D in Eastern Europe, PAL-B or PAL-G in Central and Western Europe, NTSC in USA, SECAM - France).
- Choose the Sound Mode - Auto, Stero, Mono, Dual.
- Choose the right Sound System (has effect only if "TV Card has MSP" option is checked) - FM B/G for Stereo Channels.
- Press "Start" button and wait till ChrisTV finds all your TV Channels.
- Press "Save" button to store the channels that were found or "Cancel" button to discard the scanning and keep previous Channels List. Note: If after performing an autoscan no channel is found, please check if you have set correctly the Channel Table and Video Standard.
If everything has been set correctly then please read the "Use secondary channel scanning system" option and try to do another scan.
);)
- Choose the right Channel Table (PAL-DK in Eastern Europe, PAL-BG in Central and Western Europe, NTSC in USA; Note: this could be different in some countries)
- Frequency Field - you can set the starting frequency for scanning, if you want to start it from the first frequency press RESET button.
- Choose the right Video Standard (PAL-D in Eastern Europe, PAL-B or PAL-G in Central and Western Europe, NTSC in USA, SECAM - France).
- Choose the Sound Mode - Auto, Stero, Mono, Dual.
- Choose the right Sound System (has effect only if "TV Card has MSP" option is checked) - FM B/G for Stereo Channels.
- Press Start Button and wait till ChrisTV will find all your TV Channels.
- Press Save Button to store the channels that were found or Cancel Button to discard the scanning and keep previous Channels List.
ChrisTV Settings Tab
);)
- ChrisTV Program Priority Class (e.g.: when the image is not syncronized with the sound on preview mode)
- Enable/Disable Wheel Mouse Control - Up & Down Channel
- Swap Up/Down cursor arrows on channel change
- Hide/Show the channel number in the popupmenu channel list and in the TV OSD.
- Enable/Disable Monitor Power Off & ScreenSaver while ChrisTV is running.
- Enable Multimonitor Feature if you have two or more monitors in use.
- Customize ChrisTV Agent settings
- Customize ChrisTV TrayIcon settings
- Popup Channels Menu on mouse left click
- Choose if you want the teletext to be shown in the TV Window or in a separate window.
- Mute sound input on ChrisTV exit.
- Choose your custom Radio Logo.
Image & Sound Settings Tab
);)
- The global image properties : Brightness, Contrast, Saturation, Hue & Sharpness.
- The aspect ratio mode : Stretched, Letterbox, Crop.
- The Sound Source and the Volume.
Video Rendering Settings Tab
);)
In Video Rendering Settings Tab you can customize and optimize :
- The video preview resolution for better quality/performance (recommended is 640x480).
- You can choose between 3 video rendering modes :
- Overlay Mixer - for less CPU usage
- VMR9 - Video Mixing Renderer (only with DirectX9 - for image quality and less CPU usage) - recommended under Windows Vista
- EVR - Enhanced Video Renderer (only with DirectX10 - for image quality and less CPU usage) - recommended under Windows 7
- Normal Video Renderer.
- Enable/Disable Video Renderer while using Radio Mode, so the CPU ocupancy will be lower, but the channel switch time between TV Mode and Radio Mode could increase.
- Enable/Disable Deinterlace Filter - for better image quality, but higher processor usage.
- Set the deinterlace plugin type (available only in Professional and Standard)
- Enable/Disable FFDShow Filter - for better image quality, but higher processor usage.
- Activate/Deactivate the Image Processing Filter - available ONLY with ChrisTV Profesional version. Note: Dscaler Deinterlace Filter and FFDShow Filter must be installed in order to use them.
Please click here to download the files